

| Start out by making 6 sectors like the picture shown. Set the Sector Tag of the two smaller sectors to 25. For the rest of this page, I'm going to refer to these two sectors as the "Tagged Sectors". Do not change any of the floor heights of these sectors you've created, they should all be the same. What basically is going to happen is the game will shift any non-player space (marked by the white lines) in each sector to either the left or the right depending on how we've set it up. Therefore, the ceiling and floor should be at where you want it to look when the door is open. The two sectors directly to the top and bottom of our tagged sectors are going to be used in a step later on; they are important to place. |
|
| Insert two SE sprites, one in each of the tagged sectors. Change their hitags to a number not used elsewhere by any sliding door. We want to make them the same hitag so both doors will open at the same time. Change the SE lotag to 15. Insert a GPSPEED sprite within each of these two sectors. Change the GPS lotag to 512. The GPS lotag is the distance the doors will open. This will probably take a lot of adjusting as you test your level. The last thing to insert is a MusicAndSndFx sprite. You only need to insert one, as both doors will open simultaneously. Just make sure the MSFX is within one of those two sectors. Change the MSFX lotag to 170, which is a long, dragging sound. |

|
| Change the angle of the left-most SE-15 to point right. Change the angle of the right-most SE-15 to point left. They should point in the direction the door will close to. Take grid-locking off and move all of our Sector-Effectors, GPSPEEDs, and MSFX sprites as close to the dividing line as possible. It also helps to take off showing of tags by hitting < CTRL >-T. |
|
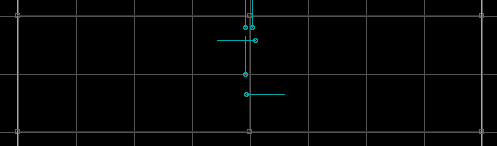
| The next few steps are a little difficult to explain, so I'm going to show them in little increments. With grid-locking off, insert two vertices on the two white lines of our tagged sectors. |

|
| Move these points (which are now our "doors") inline and right next to our sprites, but making sure not to leave the sprites outside of player space. |

|
| Move the adjacent top and bottom sectors' vertices to right above the tagged sector's top line. Do the same for the three other corner vertices. |

|
| Move it just a hair above the red line. |
|
| Do the same for the other three. The bottom two should be just below the red line. |

|
| These last few steps were necessary to avoid texture warping; that nasty little effect when sectors are getting pushed around. The warping is still there, the player just can't see it :) | |
 , All Rights reserved.

| Copyright ©1996 Tyler Matthews, All Rights reserved. Go back to my Duke FAQ BUILD page Go back to my Duke FAQ BUILD page Text-Only |